


Key Takeaways:
- Apple HomeKit integration lets your iOS app connect to smart accessories using a single framework, so you don’t have to deal with different systems from each brand.
- The HomeKit Accessory Simulator lets you test HomeKit integration fully in Xcode before physical hardware ships.
- HomeKit development in Swift centers on four core classes: HMHomeManager, HMHome, HMAccessory, and HMCharacteristic.
- HomeKit is an Apple-exclusive framework; there is no “Android HomeKit,” and cross-platform smart home apps typically build on Matter instead.
- A working HomeKit app developer setup requires the HomeKit entitlement, an Info.plist.plist usage description, and the Hardware IO Tools for Xcode.
Global smart home household penetration is projected to reach 82.1% in 2026, climbing toward 92.5% by 2029. Apple HomeKit integration helps Dedicated iOS developers turn that demand into real apps, giving them a secure way to discover and control accessories without writing custom code for every manufacturer.
This guide explains what you need for HomeKit integration in Swif, from setting up permissions to testing with Apple’s accessory simulator so you can get your app up and running quickly.
Apple HomeKit integration lets your iOS app connect to Apple’s HomeKit framework, enabling it to find, set up, and control smart home accessories using a single protocol. Developers use Swift APIs and can test everything with Apple’s free Accessory Simulator, even before they have real devices.
Smart Home Fragmentation and the Case for Apple HomeKit Integration
Smart home devices come from many different brands, each with its own way of connecting. HomeKit integration solves this by giving accessories a common language your iOS app can use.
The industry has converged on a similar answer at the protocol level. The Connectivity Standards Alliance’s Matter standard was created specifically because disconnected platforms and disparate development paths were “causing confusion for consumers and complicated processes for developers,” and HomeKit itself now works alongside Matter-certified accessories in addition to its own certified ecosystem.
The second half of the problem domain is security. Home networks are no longer just a theoretical risk – according to data collected by security vendors monitoring residential routers, hundreds of attacks on home networks are launched every day, targeting connected devices in multi-device environments. This is the main reason why, when building a HomeKit app, developers must make their devices connect via an Apple-approved protocol.
Apple’s own HomeKit framework documentation is explicit that the framework’s job is to let an app “configure, control, and communicate with home automation accessories” through a single authenticated channel, which is the architectural reason HomeKit integration reduces both fragmentation risk and security surface area at once, compared to a custom per-vendor integration.
Step-by-Step Guide to Apple HomeKit Integration in Swift
The following sections describe a functional HomeKit development environment step by step: entitlements, accessory simulation, and the Swift programming of homes, rooms, accessories, and characteristics.
Prerequisites for HomeKit Development
Before starting iOS app development, together with Swift, verify that the following three conditions are met:
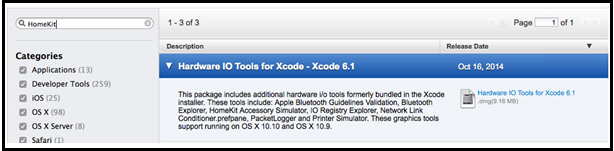
a valid Apple Developer Account to add the HomeKit entitlement, an actual iOS device for the testing phase (the simulator handles all preliminary testing), and the extra Hardware IO Tools provided by Apple in Xcode.
- Xcode 15 or later, matching the current HomeKit API surface
- An Apple Developer Program membership is required to enable the HomeKit entitlement.
- The Hardware IO Tools for Xcode, which bundle the HomeKit Accessory Simulator
Enabling the HomeKit Entitlement
Every app that integrates with HomeKit must declare the HomeKit entitlement and add a usage description string, or the app will crash on launch the first time it touches the framework. Add both to your target before writing any HMHomeManager code.
<!-- Info.plist -->
<key>NSHomeKitUsageDescription</key>
<string>This app uses HomeKit to control your smart home accessories.</string>
Apple’s guide to enabling HomeKit in your app covers the entitlement checkbox in Xcode’s Signing & Capabilities tab, which must be added alongside the Info.plist string above.
Installing and Using the HomeKit Accessory Simulator
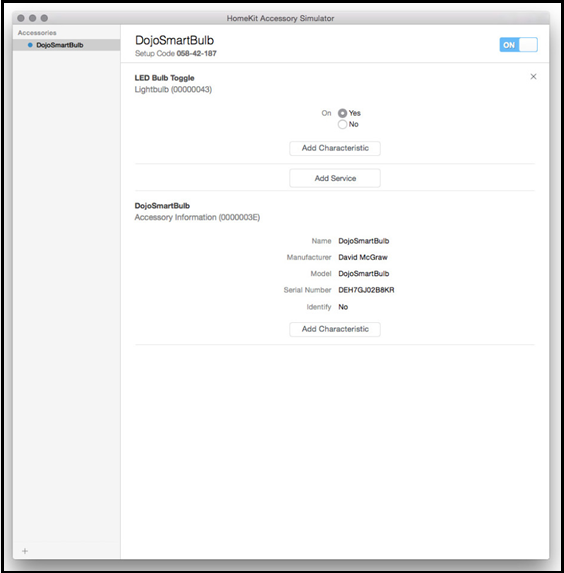
The HomeKit Accessory Simulator is Apple’s official tool for testing HomeKit integration without physical hardware. Download it from Apple’s Developer downloads page as part of the Hardware IO Tools for Xcode, then drag the simulator app into your Applications folder.
Start the simulator and create an accessory. During actual development, you do not need to communicate with your device directly through your application; when testing in the simulator, communication occurs through the bridge, just as with the actual accessory. This is well documented in the following article: Testing your app with the HomeKit Accessory Simulator.
Creating a Home and Room in Swift
The HomeKit framework divides all entities into homes, which include rooms, which include accessories. Begin by requesting an HMHomeManager object, and create a home when the manager is ready to go.
let homeManager = HMHomeManager()
func createHome() {
homeManager.addHome(withName: "My Home") { home, error in
guard let home = home, error == nil else { return }
home.addRoom(withName: "My Room") { room, error in
guard error == nil else { return }
homeManager.updatePrimaryHome(home) { error in
// Home and room are now configured as primary
}
}
}
}
Setting a primary home matters because most HomeKit read/write operations implicitly target it unless you explicitly pass a different HMHome reference.
Discovering Accessories and Reading Services
Once an accessory is added (via the simulator or a real device), drill into its services. A service group relates characteristics together, such as a light bulb accessory, for example, exposing its on/off state and brightness as characteristics of a single lightbulb service.
func loadBulbService(for accessory: HMAccessory) -> [HMService] {
return accessory.services.filter {
$0.serviceType == HMServiceTypeLightbulb
}
}
Reading and Writing Characteristics
It is within the Characteristics that the real accessory state lies. For example, to turn on a light switch, one must set the power-state characteristic of that accessory to true.
func togglePower(characteristic: HMCharacteristic, isOn: Bool) {
characteristic.writeValue(isOn) { error in
if let error = error {
print("Write failed: \(error.localizedDescription)")
}
}
}
Monitoring Accessory State with HMAccessoryDelegate
To react when an accessory’s state changes outside your app, someone flips a physical switch, for instance, enable notifications on the characteristic, and implement HMAccessoryDelegate.
characteristic.enableNotification(true) { error in
guard error == nil else { return }
}
func accessory(_ accessory: HMAccessory,
service: HMService,
didUpdateValueFor characteristic: HMCharacteristic) {
// Refresh UI state to reflect the accessory's new value
}
Conclusion
Apple HomeKit integration gives your iOS app a simple and secure way to work with smart home devices, instead of dealing with different systems for each brand. With the right setup and Apple tools, you can build and test a HomeKit app from scratch.
Ready to add HomeKit integration to your iOS app? Start with the entitlement and simulator setup above, then reach out to our team if you want to hire dedicated Swift developers from CMARIX to scope, build, or audit the integration for you.
FAQs About Apple HomeKit Integration
What is the HomeKit Accessory Simulator, and how do I install it?
The HomeKit Accessory Simulator is the official tool from Apple that simulates your accessories to test HomeKit applications without any actual hardware. The simulator comes pre-packaged in the Hardware IO Tools for Xcode package, which can be downloaded from Apple’s Developer Downloads website.
Is HomeKit development only possible in Swift?
HomeKit, using Swift, is the recommended approach and is better documented because all of Apple’s samples and new APIs are written in Swift. However, HomeKit can also be used in Objective-C for those who still work with legacy projects. New projects must use Swift.
Can I build a HomeKit app for Android?
No. HomeKit is an Apple-exclusive framework available only on iOS, iPadOS, watchOS, and macOS. There is no “Android HomeKit” equivalent, and Apple does not offer an Android SDK for it. Teams needing a genuinely cross-platform smart home app typically build on the Matter standard instead, which HomeKit itself can also interoperate with.
How is Apple HomeKit integration different from Matter?
HomeKit is Apple’s proprietary framework and certification program for iOS apps and accessories; Matter is an open, cross-vendor connectivity standard governed by the Connectivity Standards Alliance that Amazon, Google, and Apple all support. A HomeKit app developer can support Matter-certified accessories through HomeKit’s existing APIs, getting cross-ecosystem hardware compatibility without abandoning the native iOS integration.
What permissions does a HomeKit app developer need to request?
Beyond the HomeKit entitlement itself, apps must include an NSHomeKitUsageDescription string in Info.plist, which is the permission prompt text that iOS shows the user the first time the app requests access to home data. Without both the entitlement and the usage string, the app will crash rather than gracefully fail.
How long does HomeKit integration typically take to implement?
Basic HomeKit integration (home/room configuration, accessory discovery, and reading/writing their characteristics) is usually possible within 1-2 weeks for developers already familiar with the framework. Full production-level HomeKit integration (state monitoring via delegates, proper error handling, and a polished interface) typically takes 4-6 weeks, depending on the number of accessory types the app requires.