Quick Summary: It has never been easier to create an iOS app in 2026, but there are definitely some steps that you have to take to do that. In this blog, we will cover all the stages of your development journey from concept validation and choosing the correct technology stack to deployment and further actions. No matter whether you are the CEO, product manager, or software engineer, this guide covers everything.
The iPhone is now over twenty years old, but the possibility of creating software for this product hasn’t diminished. It has only transformed into something new. Approximately 142 billion apps were downloaded across both stores combined in 2025.
What has been different lately is the development tools themselves. The tools provided by Apple itself have been developed quite a lot. SwiftUI has been made production-ready, Xcode is smarter now, and the journey from conception to deployment on the App Store has become better understood than ever before. While the demands from iOS users have increased. Users of iPhones have started demanding that applications run smoothly, look nice, and protect their privacy.
If you want to make an iOS app but don’t yet know how, this guide will be helpful to you.
Why Building an iOS App Is Still One of the Best Business Moves in 2026
Some people ask whether native iOS is worth it when cross-platform tools exist. Here’s the correct answer: it depends on what you’re developing, but the case for iOS remains strong for most serious products.
- iOS users have consistently higher average revenue per user than Android users, especially in North America, Europe, and Japan.
- The App Store’s curation gives your product a layer of credibility by association. Getting accepted means something.
- There is an integration of Apple hardware and software, which makes it possible to create iOS apps not replicable on any other device. Facial recognition, payment services, file sharing, and widgets work more effectively for native apps.
- Consumers who care about privacy tend to prefer iPhones, and if your app collects personal data, targeting such customers is highly beneficial.
- Due to the improvements in Apple silicon chips, iOS devices have become benchmark performers in terms of processing capacity.
What You Need Before Building an iOS App
Before writing a single line of code, make sure you have the right setup. Skipping this part leads to friction later.
Mac Requirements
A Mac is required. You cannot bypass this when developing iOS natively, as Xcode can run only on a Mac. An M-series Mac (or above) is recommended in 2026, not only because of faster builds but also because the iOS Simulator will be able to run fully. Monterey or above is a requirement; Ventura and Sonoma are preferred.
Before writing a single line of code, make sure you have the right setup. Skipping this part leads to friction later.
Apple Developer Account
You will need to enroll in the (ADP) Apple Developer Program, which costs $99 per year. This unlocks TestFlight for beta distribution, access to certain APIs, and the ability to submit to the App Store. Free accounts exist but are limited: you can’t distribute outside of your own devices without a paid account.
Xcode IDE
Xcode is the official development tool for the Mac and is free. It is available in the Mac App Store. Use the most recent stable version since the older SDK classes get deprecated by Apple often, and also the behavior of the simulator differs with each version.
Swift vs SwiftUI
Swift is a programming language. SwiftUI is a UI framework developed on top of Swift. You need Swift regardless. The question is whether you develop your interface with SwiftUI. For new projects in 2026, SwiftUI is the ideal default unless you have a particular reason to go which iOS programming language is the right for your project, that breakdown covers the full picture.
Understanding the Apple Ecosystem
The good news about iOS app development is that it’s not restricted only to iPhone development. The Apple platform ecosystem includes iPad, iPhone, Mac, Apple TV, Apple Watch, and even Vision Pro. A decent iOS app can easily be made compatible with iPad with some minimal effort, if at all.
This matters for product strategy. If your users are Apple-first (which many professional and premium users are), building natively means you can meet them on every device they own. Think about this early, because architecture decisions made at the start affect how hard it is to expand later.
How to Make an iOS App: 8 Steps to Go From Idea to App Store
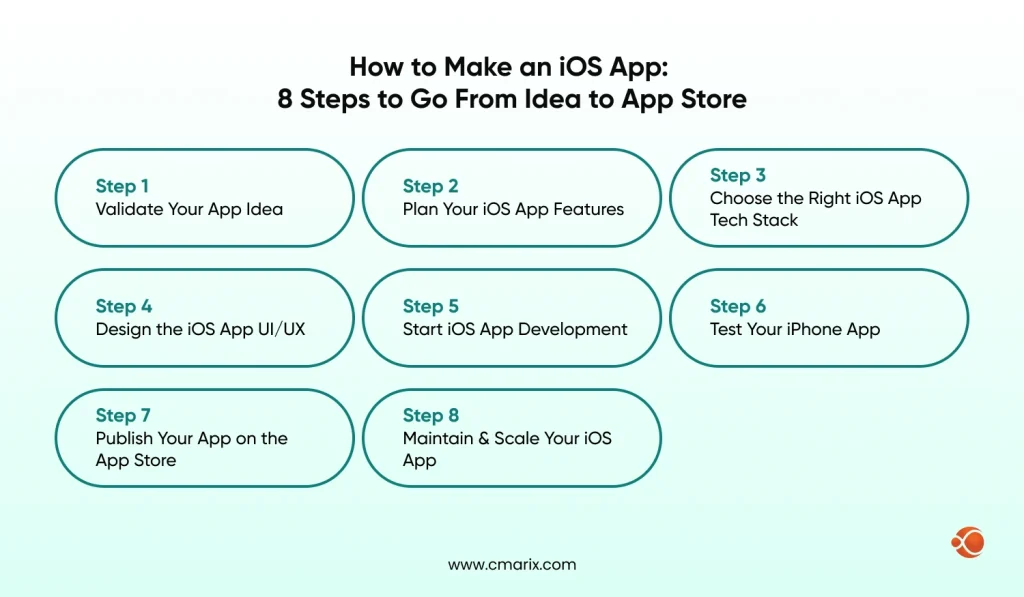
Step 1: Validate Your App Idea
The absolute worst thing you can do is spend six months making something that no one wants. Validation doesn’t need to be difficult, but it does need to take place before any significant amount of time and money are committed.
- App Store research: look into what other applications are doing to solve similar problems by reading 1-star reviews on the App Store.
- Talk to at least 10 potential users about their current process, not whether they would use your app.
- Make a simple landing page that explains your app idea and then run a tiny paid advertising campaign to measure signups.
- Search volume for keywords related to your app ideas on App Radar and Sensor Tower.
Step 2: Plan Your iOS App Features
At this stage, once you’re confident the idea has legs, the next step is scope. Most first-time app builders try to include everything in version one. That is wrong, first define your core loop and build around that first.
- List all features, then reduce that by half. What remains is the v2 roadmap.
- User flow can be sketched on paper or FigJam before starting design.
- Metrics must be set up at the very beginning of work for the proper measurement of results, such as the retention rate, DAU, session time, etc.
- It is required to understand whether there is a need in the backend, and if there is, how much data should be stored there and not on the device.
Step 3: Choose the Right iOS App Tech Stack
This decision shapes everything from development speed to long-term maintenance. Here’s a simple breakdown:
| Option | Best For | Primary Language | Performance |
| Native Swift / SwiftUI | Complex, polished, platform-specific iOS apps | Swift | Best |
| Flutter | Startups building iOS and Android apps quickly | Dart | Near-native |
| React Native | Teams with an existing JavaScript codebase | JavaScript | Good |
| Ionic / Capacitor | Web applications packaged for mobile devices | HTML, JavaScript, CSS | Adequate |
For most products where user experience is a differentiator, native Swift is the right call. For MVPs with tight timelines and budgets, Flutter app development is worth serious consideration. It’s come a long way.
Step 4: Design the iOS App UI/UX
iOS users are used to a certain feel. Apple’s Human Interface Guidelines exist for a reason. Apple has studied how people use phones for two decades. That doesn’t mean every app has to look the same, but it does mean breaking those conventions needs a good reason.
- Use Figma for design and prototyping. It’s the industry standard and works well with developer handoff.
- Use Apple’s SF Symbols library for icons. They scale correctly, support Dark Mode automatically, and look native.
- Design for Accessibility right from the start. VoiceOver and Dynamic Type are not extras; they are mandatory.
- Stick to a minimum tap target size of 44pts. Tiny buttons are just plain frustrating!
- Test your designs on real device screen sizes, not just the simulator. Things look different on a 6.7-inch screen vs. a 5.4-inch one.
Step 5: Start iOS App Development
Once designs are set and the stack is determined, the process moves on to development. Here’s how to approach the development stage without the disarray that ruins most projects for their first time out.
- Start the project using Xcode and organize your folders immediately: Models, Views, ViewModels (or Controllers), and Services.
- Implement Git with branching right away. Solo developers especially need version control, in case something goes wrong in the middle of the night.
- Add crash logging immediately (e.g., Firebase Crashlytics, or Sentry). You will need your crash logs as soon as your first TestFlight build.
- Build the core screens first. Get something functional in TestFlight before polishing anything.
- Use Swift Package Manager for dependencies. It’s Apple’s native solution and plays better with Xcode than CocoaPods
Hire vetted iOS developers who ship clean, production-ready code.
Step 6: Test Your iPhone App
Testing on a single device isn’t testing. You should test iOS apps on multiple screen sizes, iOS versions, and real-world scenarios like poor network and low battery.
- Deploy your app to real devices using TestFlight for beta testing. The feedback that you’ll receive from 20 testers is way better than anything else.
- Unit test the business logic of your application. But don’t write unit tests for everything. Just those areas where there’s a risk of introducing a critical bug.
- Perform testing on actual hardware and not on simulators. Simulators do not emulate hardware limitations effectively.
- Use Instruments to find memory leaks and CPU spikes prior to submission.
- Test on iOS 16 and iOS 17 minimum, despite your application being intended for iOS 18+. Many people update their iOS version very slowly.
Step 7: Publish Your App on the App Store
This is the point where many developers encounter some unexpected obstacles. The approval process is rather strict and entails plenty of rejections among first-time applicants. Here are some tips to go through the checklist successfully.
- Fill out your app listing in the App Store Connect – graphics, app description, keywords, and category.
- Compose a privacy policy and a terms of service section. These two are absolutely required.
- Provide a detailed App Privacy nutrition label without any lies. This is usually a reason for rejection.
- Make sure that your app doesn’t crash on start-up. This goes without saying since Apple will definitely check everything.
- Include your demo login details if there’s a need to use them in order to launch your app.
- On average, the review period takes 1-2 days, though you should expect up to a week just in case.
Step 8: Maintain & Scale Your iOS App
“Shipping” is only the beginning. Untouched applications after release experience declining scores, user churn, and unfavorable reviews. Plan for an ongoing effort at the outset.
- Update the OS regularly. Apple’s iOS release schedule is every September, meaning that your application must be tested on betas starting in June.
- Track the crash-free rate, App Store score, and retention trends weekly.
- Address App Store reviews. It sends a message to the user (and even to Apple’s recommendation algorithms) that you are maintaining the app.
- Plan for new features periodically. Once per quarter works for most small organizations.
How Much Does It Cost to Build an iOS App in 2026?
Cost is one of the most searched questions around app development, and the honest answer is: it depends heavily on complexity. Here’s a realistic framework.
| App Type | Estimated Cost (USD) | Timeline | Common Examples |
| Basic App | $10,000 – $30,000 | 2–4 months | Simple utility apps, informational apps, and basic listing platforms |
| Medium Complexity | $30,000 – $80,000 | 4–8 months | Apps with social features, payment systems, and API integrations |
| Enterprise App | $80,000 – $250,000+ | 8–18 months | Enterprise platforms with custom backends, advanced security, and IoT integrations |
Factors Affecting Development Cost
These cost estimates make use of the assumptions that we have skilled developers as well as a properly scoped application. The factors that would influence the rising or falling cost levels will include backend complexities, integration with third-party services such as maps and payment gateways, and compliance.
If budget is a constraint, one practical path is to build an iPhone app with an offshore partner for the initial build, then bring maintenance in-house. You can read more about how to approach that decision in this guide on Outsource app development.
Get a free estimate tailored to your app’s scope and features.
Common Challenges in iOS App Development
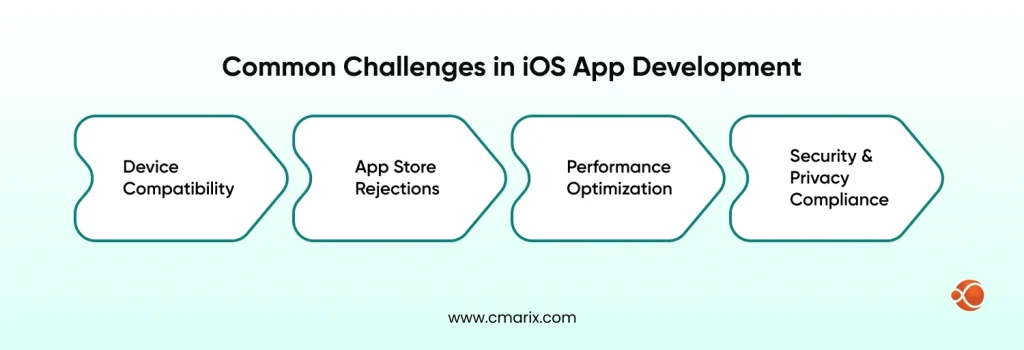
Device Compatibility
The company frequently adds new hardware capabilities and screen sizes to its portfolio. An interface that is ideal for the iPhone 16 Pro Max can be problematic on the iPhone SE. Interface designs must always accommodate varying layouts through SwiftUI or Auto Layout.
App Store Rejections
Guidelines issued by Apple are comprehensive and sometimes subjective. Rejection reasons include incorrect privacy disclosures, a lack of a privacy policy, a broken demo account, and UI not meeting the usability criteria. Guidelines should be read before development and not after.
Performance Optimization
Lag is evident among iOS users. Any application that takes more than 2 seconds to launch, cannot be scrolled properly, or consumes battery too soon will be deleted. Use the Instruments tool from Xcode as much as possible.
Security & Privacy Compliance
With Apple taking a strong stance on privacy through its marketing strategy, it has filtered down to developers as well. Data minimization, on-device computation wherever feasible, and requesting permissions transparently are some of the basic requirements. Apps that collect unnecessary amounts of data are identified during the review process.
Native iOS vs Cross-Platform Development: Which is Right for You?
This is the question most development teams wrestle with before starting. Here’s an honest breakdown.
Native iOS Development Benefits
- Full access to every iOS API and hardware feature the moment Apple releases it
- Best-in-class performance with no JavaScript bridge and no runtime overhead
- Tighter integration with Apple services like Sign in with Apple, iCloud, and HealthKit
- Generally, lower long-term maintenance costs for iOS-only products
Flutter vs Native iOS
Flutter is effective for cross-platform development. The gap in performance due to native code has narrowed significantly, and the process of development is quite enjoyable. But what Flutter lacks is its inability to integrate deeply with the underlying platforms.
For instance, if you need full control over iOS behavior or want to utilize newly introduced Apple frameworks soon after release, there is a likelihood that you might have to wait for support from Flutter. But if such functionality is unnecessary, then Flutter would be a reasonable choice indeed.
React Native vs Swift
React Native will work wonders for you if you have expertise in JavaScript and require the app to be delivered to both environments quickly. Though the improved architecture has made React Native perform faster, its stability when developing natively has been less than that of Swift. The solution will suit best if your developers have expertise in web technologies, while Swift will be more preferable otherwise.
| Factor | Native Swift | Flutter | React Native |
| Performance | Best | Near-native | Good |
| iOS-specific Features | Full access | Partial access | Partial access |
| Development Speed | Slower | Fast | Fast |
| Team Skill Requirement | iOS specialist | Dart knowledge | JavaScript |
| Best For | Complex iOS-first products | Cross-platform MVPs | JavaScript-heavy teams |
Which Option Should You Choose?
If iOS is your primary platform and the product depends on a great user experience, go native with Swift. If you’re building an MVP and need to cover iOS and Android with one team on a tight budget, Flutter is the pragmatic pick. React Native is the right choice if your existing team knows JavaScript and cross-platform parity is a business requirement.
How CMARIX Can Help You Build Your iOS App
At CMARIX, we’ve helped businesses across industries, from early-stage startups to established companies, create an app for iPhone that actually holds up in production. Our team includes skilled Swift developers who work with both UIKit and SwiftUI, and we also offer Flutter App Development for teams that need to ship across platforms without doubling the budget.
A practical approach: You bring the concept and context of the business, and we take care of the architecture, App Store listing, integration, and support post-launch. This is done in such a way that you remain updated at all times without being bogged down by details.
If you’re figuring out the right approach for your project, talking to a team that’s done this before saves a lot of trial and error. You can hire iOS developers from our team on a project or dedicated basis, depending on what your project needs.
Conclusion
Building an app for iOS in 2026 is a true process, yet it is not an easy one. However, the tools, documentation, and the entire process from start to finish are well established; there is no need to reinvent the wheel. All it takes is to make the right moves along the way: do some validation before coding, planning before design, testing before shipping, and maintenance planning before launching. The most common mistake is not a technical issue, but the approach to the App Store submission process.
FAQs on Making an iOS App
What programming language and tools should I use in 2026?
For iOS development, Swift is used. For UI, SwiftUI is the recommended framework for any new projects. Xcode is the IDE; there’s no real alternative for native iOS work. If you’re going cross-platform, Dart with Flutter is the most competitive option right now.
Can I build an iOS app on a Windows PC?
Not really, since Xcode needs macOS, and there is no workaround that I know of. While some people use cloud-based macOS computers for building their software for CI/CD via GitHub’s macOS runners, for general development, you need macOS running on a Mac computer.
How much does it cost to build an iOS app in 2026?
From $10,000 for an average utility application to $250,000 or even more for a sophisticated enterprise software. Why such a vast difference? Because of varying factors involved: team size, backend, complexity, and compliance regulations – everything affects costs. The middle ground app with API integration and a user-friendly interface would most likely cost from $40,000 to $80,000.
What are the key requirements for publishing on the App Store?
This will require you to have an active Apple developer account for which you’ll pay $99 per year, a privacy policy, a correct App Privacy label, App Store screenshots, and an application that meets all Apple’s technical requirements. Most rejected applications are rejected due to privacy label issues, lack of demo accounts, and crashing of apps during startup.
What is the difference between native Swift and hybrid cross-platform apps?
iOS-native Swift applications are developed particularly for iOS-based systems using proprietary tools and APIs provided by Apple. These applications deliver the highest performance and provide the deepest integration with the operating system. Flutter and React Native, which are examples of hybrid apps, rely on the same codebase for targeting different platforms and, while reducing development costs, come at a certain price in terms of performance and feature support.
How do I test my app before launching?
TestFlight can be used, which is the Apple testing framework. You can distribute your app to 10,000 external users even before releasing the application. Apart from that, use the instruments tool provided by Xcode to debug any performance issues or memory leaks, build unit tests to verify the business logic, and test the app using actual devices.