If you’re fascinated by iOS app development but don’t know where to begin, this is the guide for you!
How to construct an application from the ground up.
In this article, I’ll walk you through the entire process, from brainstorming the idea to putting it into action.
- Discover ideas for innovative app concepts.
- How to determine whether your app idea is solid?
- How to develop your app idea further?
- Advice on how to draw attention to your app on the App Store
- How to develop and use your app concept?
If you think that’s something you’d be interested in, then let’s get started!
Planning Your iOS Application Development
Your iOS app’s development strategy depends on the kind of product you’re developing. Planning is one of the most vital tasks to do before developing your iOS app, whether you’re creating a game for mobile devices, a standalone app that functions as your business, or a complimentary app to your existing one.
A strategy should always begin with a detailed written sketch of your concept.
Outline your app’s features as precisely as possible, keeping in mind which ones should be given top priority.
When creating your first app, it can be helpful to think of it as a Minimum Viable Product (MVP), carefully selecting the features that will be prioritised for launch.
After deciding on a general strategy, it’s important to ask yourself a series of questions to ensure that you’re ready to construct and launch your app.
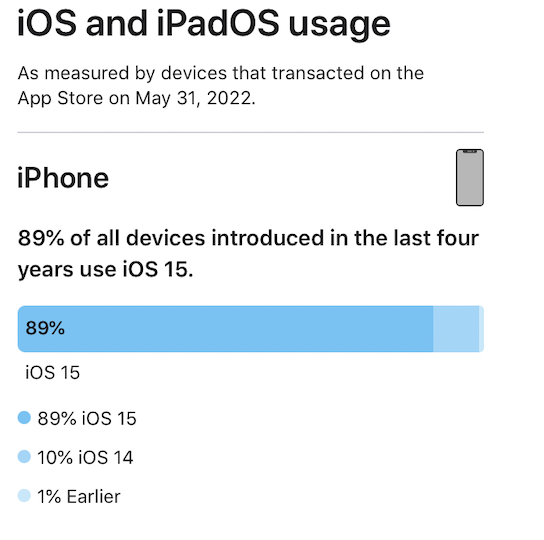
The majority of Apple users use the most recent version of their device, which makes programming and development simpler because you can reasonably predict what your app will be able to do.
According to Apple, iOS 15 is installed on 72 percent of all iPhones released in the last four years.
The Fundamentals of developing an iOS app
Start by identifying the most important requirements to develop an iOS app, picking the appropriate iOS programming language, and using cloud-based tools to improve outcomes.
Comply With the Developer’s Requirements
A few things must be in place before you can start writing any code for your iOS app.
A Mac machine operating with the most recent version of macOS
If you do not want to spend money on a complete mac setup. There is a product made by Apple called the Mac Mini. You may buy this little, portable computer. All you need to do to get going after receiving your Mac Mini is to connect it to a monitor.
Improved hardware configurations will make it easier to design iOS applications. After learning the ins and outs of the Mac operating system, it’s time to sign up for an Application Developers account.
Register for an app developer account: It’s completely free to sign up as an Apple Application Developer. As soon as you register, you will be granted access to the iOS SDK and development videos, as well as other technical materials, including the Xcode software.
Xcode is an integrated development environment (IDE) for macOS, which can be downloaded for free from the Mac App Store and used to develop applications
Together, these three conditions work just fine. The Apple App Store is only open to active members of the Apple Developer Program. The App Store only accepts applications signed and published by Xcode. Only macOS and Apple PCs are compatible with Xcode.
It’s important to know that Xcode provides much more than just the option to sign and publish your finished software. Practically everything you need to develop iOS apps is included in the IDE, along with a user interface designer, code editor, testing engine, asset catalogue, and more.
Prepare an iOS-Ready Environment
Now that Xcode has been successfully installed and set up, it is crucial to have further knowledge of the same.
Launch Xcode and initiate the creation of a new project. You must become familiar with Xcode’s user interface. The interface consists of five major sections/components.
- Toolbar
- Editor Area
- Utility Area
- Navigator Area
- Debug Area
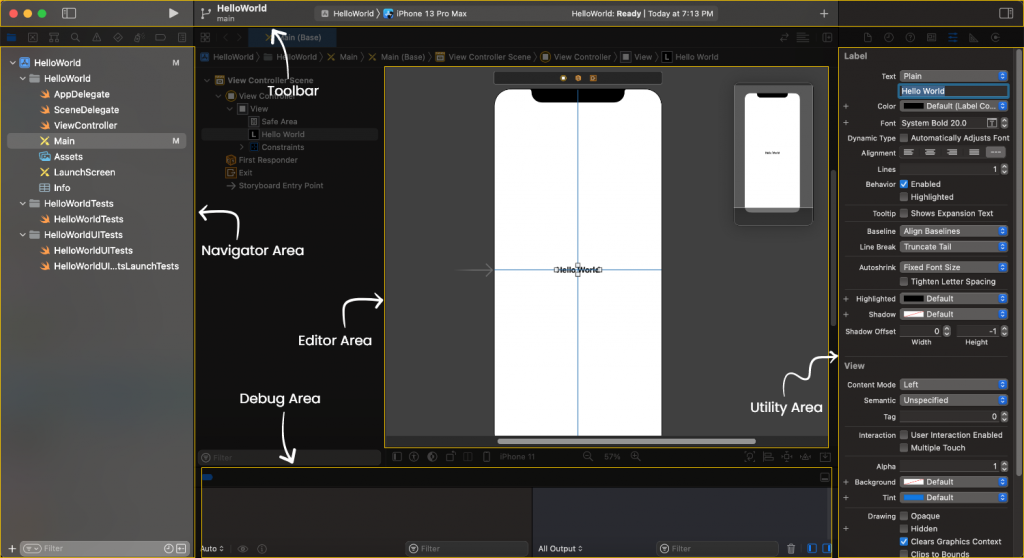
Xcode’s User Interface
Understanding these areas thoroughly will be beneficial as you progress through the stages of development.
Make Use of libraries and APIs
When developing apps for iOS, you have access to a wide range of developer resources. Apple is able to distribute native APIs and libraries as kits that are reliable, feature-rich, and simple to use because iOS app development is standardised, functional, and consistent. These iOS SDKs allow you to easily include your app into Apple’s current system.
These comprehensive kits enable you to easily utilise iOS capabilities and incorporate third-party applications, allowing you to develop apps that link to social networks, use the camera or native calendar app, or automatically capture replay footage of particularly exciting gaming moments.
Let’s Examine the Specifics of How to Create an iOS Application
Activate Xcode and Create the Project
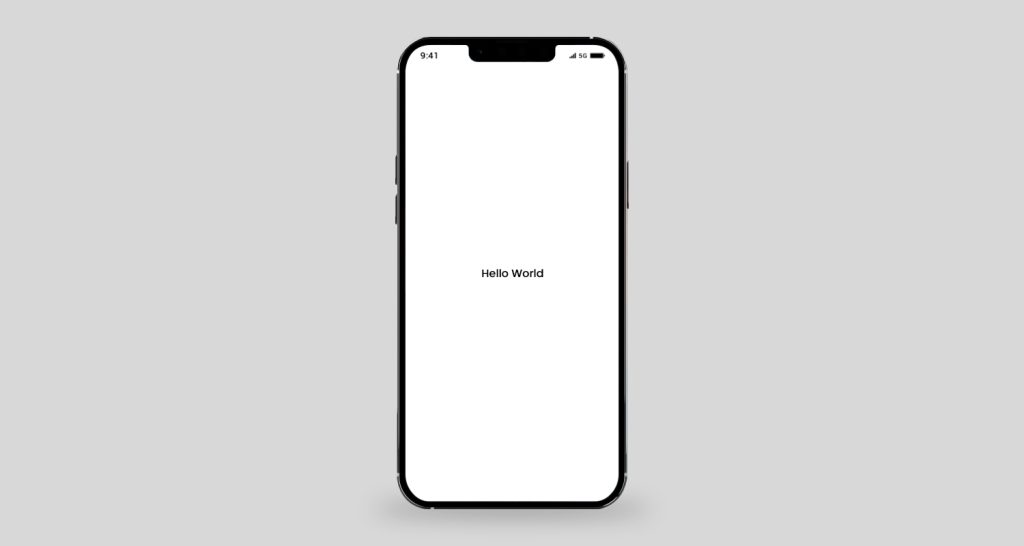
Hello World, double-click on it once you’ve dropped it on the view.
To create a new project, select the option to create a new Xcode project. Next, select Single View App as the project type, and then click Next. A storyboard that you can further alter will be included, along with one view controller.
Let’s follow convention and give your project the name HelloWorld. At this time, select Team None. Select Swift as the programming language, click Next, and your app will be created with no functionality.
Following the suggested procedures will ensure that the project is properly set up.
- Launch Xcode.
- select “file” > “new project”
- Next, click the app.
- Use a name for the project that suits you.
- Ensure the storyboard of Swift UI is selected.
- You have the choice between Swift and Objective C
- Select “next”
- Choose the location for your new file and save it.
Note: You must use an Objective-c or Swift programming language to create a native iOS app. Apple’s new Swift programming language, which is simple to learn, has gained huge momentum in a short period of time.
In no time at all, you’ll have a brand new app that says Hello to the World. From the left panel of the code editor in Xcode, you can go to a file or folder. You can manage views or any component in the storyboard using the Utility Area, the right panel of the code editor.
The Run and Stop buttons are located on the top toolbar. You can see the debug/console section, which includes breakpoints and other runtime tools, at the bottom of the code area.
Now navigate to the project directory, and click Main. storyboard, and then open it. The storyboard is a file used to organise and create your view’s various elements, including buttons, labels, lists, tab and navigation bars, and more. A blank view will be displayed here. By clicking it, you may choose the view.
When using Xcode 10 or higher, select the View menu from the menu bar, choose Show Library, and then drag an object like a label to the focused view. Object Library may also be found in the lower right corner of Xcode in earlier versions. In order to alter the label’s text to Hello World, double-click on it once you’ve dropped it on the view.
Here it is, your very first app on the screen.
Run the iOS programme.
In the top left corner of the Xcode screen, close to the Run/Stop button, and choose the device destination or simulator. And to run the app, either click the run button or press Command + R. Your first app will run and the iOS simulator will start up.
To launch the application on a real device, connect the device to the Mac via cable. The gadget will automatically appear in the gadget destinations list. Press Command + R after choosing the device.
Test your application and complete the process.
Testing for quality control comes next after all phases of technical application development have been completed. Given the challenges involved in submitting and getting Apple’s application approved, testing or assessing the iOS application is an important stage. The app’s performance, user experience, debugging, memory utilisation, security, and adherence to all Apple policies should all be carefully examined by the developer.
Your application can be sent to the App Store for further assessment and approval when you have reviewed it and determined that it won’t be rejected
Learning about Apple’s Design and Development Principles
You must publish your iOS software to the App Store once you’ve finished developing and testing it. Your software can be submitted and signed simply using Xcode. Keep calm: The app review process can take a while, and you may need to go through several rounds of revision, resubmission, and rejection before receiving your ultimate clearance.
Once everything has been approved, you may use a tool called App Store Connect to generate your App Store page and publish your app to the App Store.
SEE ALSO: Outsource App Development
A Summary of the Guidelines for App Store Reviews
When it comes to releasing a new app, Apple has specific rules. Before uploading an app to the App Store, every programmer must follow specific rules. So before you start developing iOS applications, it’s crucial that you understand all of Apple’s design and development requirements.
Security: Before downloading an app on their device, each user must feel secure. Apple has a stringent policy about the removal of apps that have inappropriate or disturbing content.
Effectiveness: Be sure to submit a finished copy of your software to the Apple App Store. Apple demands that the program you publish runs without any interruptions. Before you submit it, everything should work without a hitch.
Business: Ensure that you have a thorough understanding of your application’s monetization strategy. Provide an explanation of the business model in the metadata and Review notes if you are unsure.
Layout: Apple fans adore using software that has been created with a modern, creative aesthetic. Furthermore, depending on how you design something, it’s important to uphold a standard while doing so.
Ethical: Before beginning the process of developing an app, it is crucial to adhere to legal standards.
Prevent Future Application Denials:
Crashing, having bugs, having placeholder content, and having broken links will all put your app on the reject list. Apple has drawn attention to a few of the problems to prevent that and prevent your app from being rejected.
Apple’s Design Requirements: Apple demands a certain level of consistency across its App Store. This doesn’t mean your app must have an overly complex user interface, but it must include essential UI design elements. Top iOS app development companies understand this well and prioritize both functionality and design. Your ultimate goal should be to submit the best version of your application possible. Learn more about app store improvements.
What’s the Next Step?
When an app is successfully uploaded to the App Store, development of that app is concluded. However, the process of making an iOS app never really ends.
When an app is released, ongoing app maintenance begins. App analytics platforms are used to track user behaviour, and KPIs are used to gauge success. Functional and security vulnerabilities are patched as they appear, and app features and interface are updated in response to user feedback, iOS requirements, and new upgrades.
Knowing everything that goes into creating the ideal iOS mobile app, the next step is to work with the best iOS app development company in India to create an iOS app of the highest calibre or to hire iOS developers.
Summing up
We can assist if you’ve been considering creating an iOS app and are prepared to move forward using an app builder. We are specialists in building apps for Macintosh and have so far worked on some amazing projects. We’d adore being a part of your iOS app development process. To discuss your idea in more detail or to initiate developing your app with CMARIX, get in touch with us.
Frequently Asked Questions
How Much Does It Cost to Develop an iOS App?
The cost of developing an iOS app can differ depending on a number of factors, including the app’s size, layers, features, and functionalities, target market, platforms, etc. CMARIX is able to offer the most inexpensive pricing for iOS app development projects because of our extensive experience in producing several successful iOS apps.
Can I See My App While It’s Being Developed?
Yes, CMARIX provides a highly iterative development method to enable our clients to keep informed and updated throughout the app project regarding the development progress and relevant attributes. You may truly follow the progress of the app development using CMARIX and maintain tabs on everything up until the project’s conclusion.
How Can I Develop iOS Apps on Windows?
Since you cannot develop or publish iOS apps without using the IDE Xcode. This is due to the fact that Xcode only supports the iOS SDK on macOS. However, virtualization software is required if you want to create an iOS app on Windows. You can access a virtual Mac OS by using a virtual computer like VirtualBox or VMware.
How Do You Develop an App for the iPhone?
To design iOS apps, you need a Mac computer with the most recent version of Xcode. Xcode is Apple’s integrated development environment (IDE) for both Mac and iOS applications. Xcode is the graphical user interface used to develop iOS applications.
Will You Assist Me to Upload My iOS App on the App Store?
Yes, in fact, we handle the entire process of submitting a program to Apple’s App Store from beginning to end. It is a component of our all-inclusive iOS app development solution package.