The technology that underpins cryptocurrency and a slew of other decentralized apps is known as the blockchain. The blockchain is a distributed public ledger that records a growing list of transactions known as blocks. It is innovative, decentralized, and distributed. Recording and securing transactions on the blockchain eliminate any possible weaknesses or vulnerabilities. Chain-like connections between distinct blocks are the reason for the moniker “blockchain.” Hence you must have apt knowledge about the process before you actually hire nodejs developer to create your cryptocurrency.
Many sectors have already found a use for the blockchain, including banking, government, collectables, DeFi, security, and artworks like NFTs, despite the fact that it is still in its infancy. In addition, it has opened up a slew of new career paths and positions for those in development, content creation, and other related fields by any nodejs development company. Because it assures data confidentiality and integrity and fosters user confidence, the blockchain is critical in the development of decentralized apps.
It is a digitally protected virtual money that was built using cryptographic methods. The currency’s integrity is protected by cryptography. Node.js, a popular JavaScript server runtime engine, will be used in this tutorial to demonstrate how to create a cryptocurrency. Using Node.js, you can execute JavaScript code outside of the browser. An introduction to the blockchain realm will be introduced in this essay by developing a rudimentary coin. Time to get this party started!
You Will Need the Following Items in Order to Follow Along With This Blog:
- Installing Node.js on your own PC.
- A comprehension of Node.js at its most fundamental level.
- A comprehension of blockchain technology on a fundamental level.
- A code editor.
The Characteristics of a Block
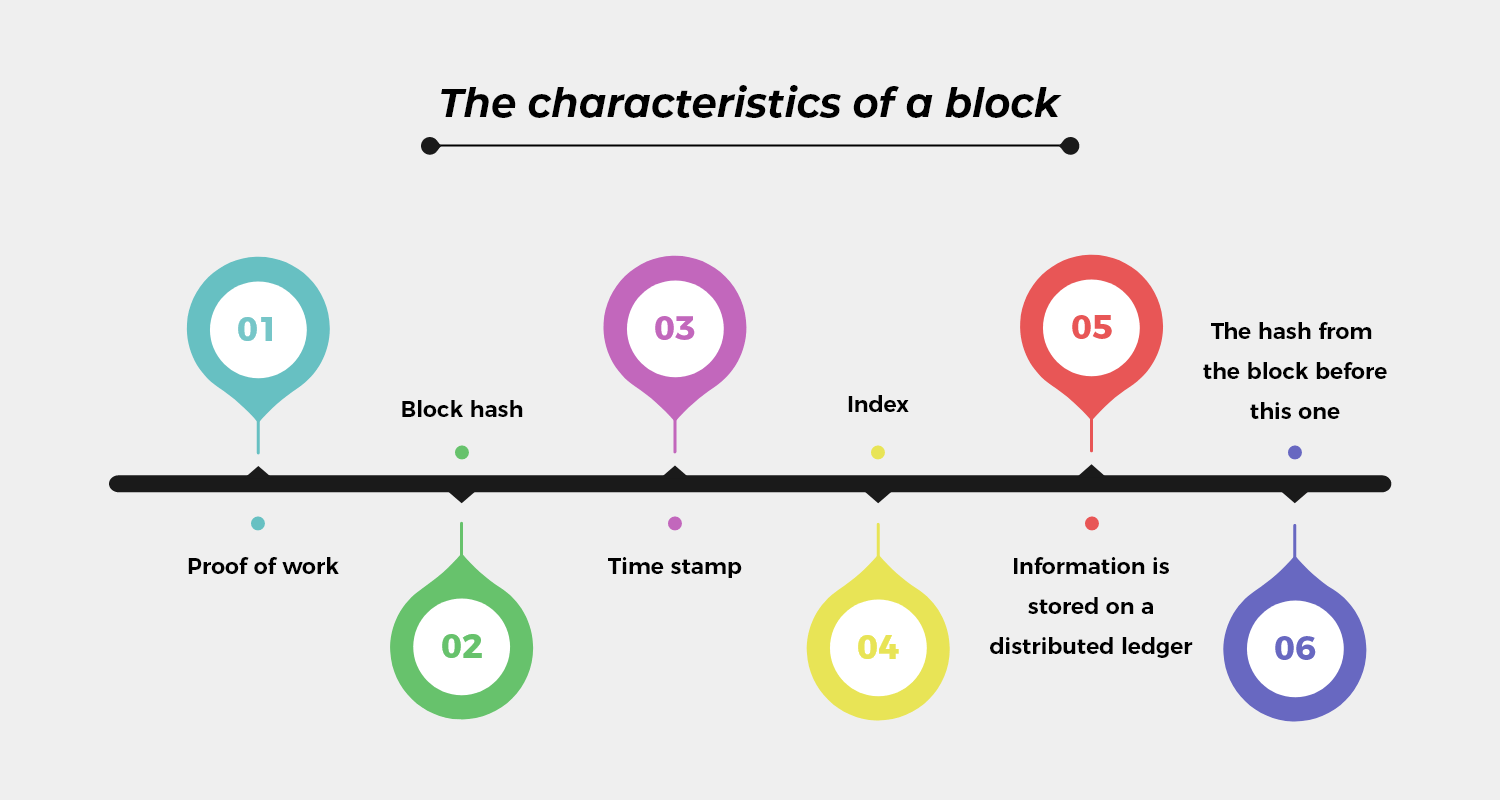
Earlier, we discussed the fact that the blockchain is made up of numerous different blocks. Let’s find out what each block’s individual characteristics are by investigating them. The following characteristics may be found in each individual block that makes up the chain:
- Proof of Work: The amount of computational work that must be done in order to get a block hash is referred to as the proof of work.
- Block Hash: A block hash is an identifier for a block that is generated via cryptographic calculations.
- Time Stamp: Time stamp indicates the time at which the block was first produced.
- Index: The index indicates where Block is located on the chain.
- Information is stored on a distributed ledger.
- The hash from the block before this one.
Installing Dependencies
Because we are developing a Cryptocurrency Exchange Platform using Node.js, the first thing we need to do is place an installation of the JavaScript crypto.js package within the folder that contains our project. Make a folder and label it with the name “nodejscrypto”. Executing the command in your terminal will install the package for you. For this particular project, we will only be using a single file. In the folder that contains the project, jot down the name “nodejsCoin.js” for a new file.

Putting Together Our First Building Block
Now that we have our project structure established and our package loaded, let’s begin the process of constructing our very own coin by generating our very first block. You should proceed to paste the lines of code that are listed below into the nodejsCoin.js file.
To begin, the Secure Hash Algorithm (SHA256) is imported from the crypto-js package so that we may encrypt our block hash ID. This is done so that no one but us can read it. After that, the JavaScript Block class is developed to serve as a model for each individual block that makes up the chain.
When a class is formed in JavaScript, as is the case with other object-oriented programming languages such as Java, the constructor method of the class is automatically called. We invoke the constructor method of the Block object whenever the new keyword is used to call the Block object. This allows us to supply the parameters that are necessary to build a new block.
The values of the parameters and arguments were allocated to the field while we were working inside the constructor method. When we use this keyword, we are indicating that we are talking about the field name that comes after it. In the end, we developed a generated hash function that, by making use of the parameters specified in the constructor, creates and returns the hash value associated with the block. Let’s get started on the blockchain now that we’ve had the first block out of the way.
Putting Together the Blockchain

The blockchain is a system that records a collection of data in a chain-like manner. This improves the data’s integrity, reduces vulnerabilities, and makes it almost hard for the data to be hacked. To be more precise, a blockchain is a distributed database that records transactions in group blocks. These blocks are the unit of storage for the blockchain. Let’s begin by constructing a class for the blockchain that will be responsible for managing the chain of blocks.
In the preceding piece of code, we created a class called Blockchain and then called its no-argument constructor function. This is a constructor that does not need any parameters or arguments. An array holding the create GenesisBlock function, which is responsible for generating the genesis block, was allotted by us within the constructor block. A genesis block is the first block that is added to a blockchain and serves as the point of connection for subsequent blocks. You may alternatively call the genesis block the ancestor block to refer to it in this context.
When a new block is added to the blockchain, it will always include a reference to the block that came before it. However, since the genesis block does not have a reference, we need to manually enter its attributes inside the create GenesisBlock function. Take note of the fact that I used the new keyword on the Block constructor and then gave the necessary inputs in order to build a block. Because the get TheLastBlock function gives us access to the most recent block on the blockchain, we are better able to monitor both the most recent and the most recently used hash on the blockchain.
The next method is called add NewBlock, and it requires an argument that is referred to as a new block. The hash of the most recent block added to the chain is made to match the hash of the new block’s prior iteration inside the body of the procedure. After calculating the hash of the new block using the generate Hash function, which is located on the line that follows, I eventually pushed the new block into the blockchain, which is an array of blocks.
The correct operation of the chain is validated using the validateChainIntegrity function. The immutability of the blockchain’s transactions is one of its defining characteristics. If any of the information on a block in the blockchain is altered in any way, the integrity of the blockchain will be compromised. The validateChainIntegrity function assists us in determining whether or not the blockchain maintains its integrity.
Our check began at index one, but the beginning of our blockchain was at index zero with the genesis block, which was predetermined. Our check began at index one. In this approach, we iterate across the blockchain, confirming the authenticity of each block by determining whether the hashes that are shared by two successive blocks lead to the same location.
Build a Prototype of Our Blockchain So We Can Test It

Now that we have the blockchain set up, we will create an instance of our currency, which I will refer to as logCoin. You are free to call it whatever you choose. Now, open the terminal and execute the code by typing in the following command. In the preceding code snippets, we built an instance of the blockchain class so that we could call or execute the add NewBlock function. With this instance, we are able to add new blocks. Keep in mind that the add NewBlock function accepts an argument, so what we did was supply a new block along with its index, date, and data as objects. These objects include the information about the sender, recipient, and amount.
In the end, we printed the result by using the JavaScript console.log function, and then we converted the output to a JSON file utilizing the JSON.stringify method, which accepts a variety of inputs depending on the specific circumstance. Our first attempt at creating a cryptocurrency, which we have dubbed logCoin, was successful.
Read more: Why Does Your Business Need a Crypto Wallet App to Gain a Momentum?
Conclusion
Using Node.js, we have now successfully completed the construction of our own simple coin. During this session, we were introduced to the fundamental ideas of blockchain technology, shown how to create a block, and then given the opportunity to create our very own coin using blockchain technology.
This course provided us with the core information that was necessary to get started as blockchain developers, despite the fact that our logCoin cryptocurrency does not fulfil the criteria that the cryptocurrency industry has set. I really hope you liked this essay; if you have any questions, please let me know in the comment section below.