Relying on tried-and-true methods reduces efficiency and, in the long run, profits in today’s technologically advanced business climate. Surely none of us wants this to occur in our workplace.
Code that can be copied and pasted from one project to another is known as “reusable” code, and many developers employ this technique. Still, you’ll need to tweak this method quite a bit to make it fit your unique project. This also makes the library susceptible to minor modifications made by other developers, which can eventually render it useless.
We can create libraries in the Laravel framework and then call its services without having to bother about the implementation details. We can keep these libraries organized and accessible outside of the project’s primary source code, allowing us to reuse them. Laravel packages are what these are known as.
Do you wish to Build Laravel Package Using Composer from scratch or are you an experienced Laravel developer?
Are you familiar with the concept of packages but confused about how to use them?
Learn the ins and outs of Laravel Package Development with the help of this handy guide.
What’s Composer?
A composer for laravel is a program that may bundle all the necessary libraries and dependencies into one. It aids the customer in developing the project by the system and project specifications. Installing third-party libraries in a project is a breeze with Composer. The conditions are managed in Composer, and Composer is where the dependencies are recorded.
Its architecture ensures that it will fetch all of the necessary PHP packages and components. In addition to building the class map for the libraries that have been downloaded, it also maintains tabs on the dependencies of those necessary components or packages.
After a single loading, it becomes available across the entire system. The DRY principle is followed. The DRY principle is fundamental to software engineering. It says that when writing an application, you shouldn’t do anything new. In this approach, both your time and the aesthetic quality of your code are preserved. If your project involves more than one developer, it will be incredibly helpful.
What Are Packages?
Packages are like standalone source codes that developers can import into their applications. Developers can import the laravel packages and use any service it offers to aid project development instead of copying and pasting library source code.
These files can have their version control system, testing, and dependency management system, all apart from the main source code. Packages are little APIs that developers can use within their projects. Once the necessary and legitimate inputs are provided, the package will execute its intended task and produce the desired result.
Why Should We Use Packages?
We should start adding features in packages when we have a lot of projects with comparable capabilities or features. Having Laravel Development Services
working on a laravel package in a platform makes it much easier to discuss and brainstorm solutions to issues and enhancements. As a result, every package will be treated the same way as any other project.
Another problem that packages address is the need for developers to make changes to their libraries to address security vulnerabilities, add new features, or correct bugs. Implementing these changes in all of the library-using projects is an enormous undertaking. To begin avoiding these difficulties, creating packages is an excellent first step. These are the Advantages of Laravel Application Development.
Prerequisite to Build Laravel Package using Composer
The following are the requirements to Build Laravel Package Using Composer:
- You’ll need Laravel version 5.5 or later.
- Your system must have Composer installed.
Initial Configuration and Setup
The following are the requirements to Build Laravel Package Using Composer:
- You’ll need Laravel version 5.5 or later.
- Your system must have Composer installed.
$ composer create-project-prefer-dist laravel/laravel package testapp
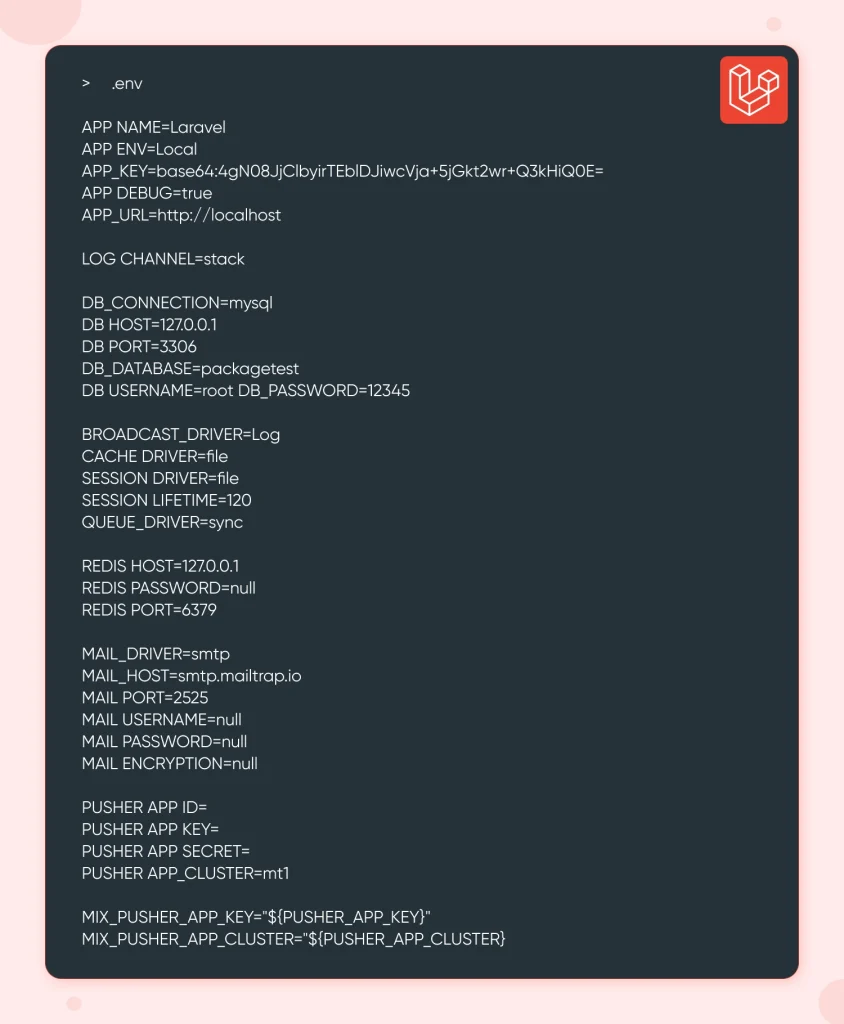
After that, you’ll have to set up your environment file by entering your app key and any other pertinent details. You may either manually copy the contents of the.env.example file to a new one and save it as.env or use the following command in your terminal. You can hire Laravel developers for your help.
When you’re done, run the command below.
$ php artisan key:generateOnce you have generated your app key and specified your database details for creating laravel, your.env should look like this.
Now we have our basic Laravel app up and running. We should begin preparing our package now. You will understand Why Use Laravel Framework for Web Development.
Project Structure
We will establish the basic requirements of our package. Two main approaches can be taken to achieve this goal:
- Making separate files and folders by hand.
- Making use of a package like this command line tool.
In this section, we will create the directories and files by hand so that we can learn how everything works.
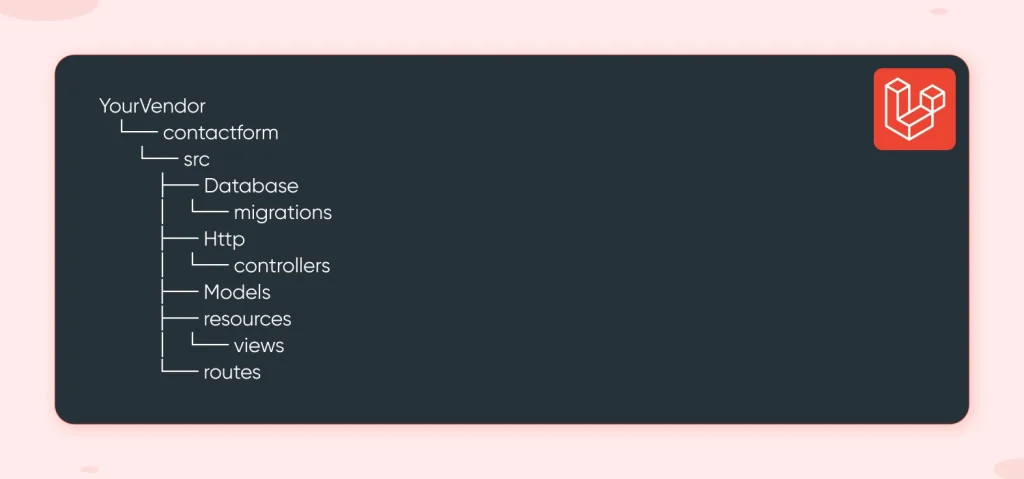
The folder structure of our package is shown here.
Starting in your root directory, make folders following this pattern. You can think of outsourcing Laravel development services for your help.
$ packages/YourVendor/YourPackage/
We will not update the code in the vendor folder, but rather in the packages/YourVendor/YourPackage/ directory outside of it, since this is not a recommended practice.
You may find our package in the vendor folder and download it once we’re done with it.
You, the vendor, or the client or company whose name you are creating the package for is represented by YourVendor.
In this case, YourPackage stands for the package name. Contact Form will be used in our case.
We can start making our package’s files and folders now.
Build a Composer File
The composer create laravel will be initialised at this point. To create composer.json, run the command below.
$ composer init
Your composer.json file will be filled out by answering a series of questions, thanks to its interactive nature. To utilise the default response, press enter; if you still aren’t sure, you can edit the composer.json file to make the necessary changes.
At this point, the composer.json file ought to resemble this.
{ "name": "YourVendor/Contactform", "description": "A contact form package for laravel", "authors": [{ "name": "Usama Patel", "email": "john.doe@email.com" }], "require": {}
}
Put this code into your composer.json file to tell the laravel composer to autoload our files.
"autoload": { "psr-4": { "YourVendor\\contactform\\": "src/" } }
At this point, our composer.json file ought to resemble this.
{ "name": "YourVendor/Contactform", "description": "A contact form package for laravel", "authors": [{ "name": "Usama Patel", "email": "john.doe@email.com" }], "require": {}, "autoload": { "psr-4": { "YourVendor\\Contactform\\": "src/" } } }
After that, we will add the remote repository later, but first, create an empty git repository to record alterations. Apply the following command for laravel web application development.
$ git init
Create Service Provider
First things first, let’s include some files in our package for laravel develop package. We need to start by finding a provider for our package’s services. Laravel uses a service provider to determine which files your package can access and load.
In the src/subdirectory, create a file called ContactFormServiceProvider.php.
$ src/ContactFormServiceProvider.php
A few things inside our service provider need to be defined for laravel package development:
- We defined the namespace in our composer.json autoload.
- The extension (the class in Laravel that our provider adds on to).
- All Laravel package service providers are needed to provide two methods, boot() and register(), which are the two most important methods.
Include these lines of code in your class for service providers.
Take note that the code below allows you to substitute YourVendor with the name of your vendor.
<?php namespace YourVendor\contactform; use Illuminate\Support\ServiceProvider; class ContactFormServiceProvider extends ServiceProvider { public function boot() { } public function register() { } }
?>
Since our package is not yet deployed and is located in our vendor folder, namely in the root of your composer laravel, we must instruct Laravel on how to load it and make use of its features. To your JSON, paste the following code.
"autoload": { "classmap": [ "database/seeds", "database/factories" ], "psr-4": { "YourVendor\\Contactform\\": "packages/YourVendor/contactform/src", "App\\": "app/" } }, "autoload-dev": { "psr-4": { "YourVendor\\Contactform\\": "packages/YourVendor/contactform/src", "Tests\\": "tests/" } },It may be automatically added by laravel module development depending on your version of the framework. Do not bother with it if that is the case.
Then, in the app’s root directory, execute the following command on your terminal.
$ composer dump-autoload
We should now see whether our composer package is loaded correctly. Let’s make a route and include it in the ContactFormServiceProvider.php file’s startup method the ContactFormServiceProvider.php.
ContactFormServiceProvider.php
$this->loadRoutesFrom(__DIR__.'/routes/web.php');
Here are the important points to remember:
This file is currently located in the current directory, which is called _DIR_.
In routes/web.php, we're referring to the routes folder we'll create for our package-not the default Laravel routes-that will exist in our src folder.
In our package's routes folder, find the web.php file and paste the following code into it.
<?php // YourVendor\contactform\src\routes\web.php Route::get('contact', function(){ return 'Hello from the contact form package'; });
?>The next step to build the laravel project is to add our new service provider to the providers’ array in our base config/app.php file, as demonstrated below.
// config/app.php
'providers' => [ ..., App\Providers\RouteServiceProvider::class, // Our new package class YourVendor\Contactform\ContactFormServiceProvider::class, ],
Run the App
Press the command to Build Laravel Package Using Composer.
php artisan serve
What you should see when you open localhost:8000/contact in your browser is:

Conclusion
You have now mastered the art to Build Laravel Package Using Composer. If you follow the instructions step by step, creating a custom Laravel package is a breeze. The Laravel project’s web app development makes use of PHP packages.
Frequently Asked Questions
What Is the Purpose of Your Laravel Package?
Laravel is one of the most popular web frameworks due to its simple and fast development environment. You can add extra functionality with the help of its packages. A Laravel application can be enhanced with the help of these packages, which contain routes, controllers, views, and configurations.
How to Create a Composer Package in Laravel?
A tool for managing dependencies in PHP packages is Composer. Without having to duplicate them in your vendor directory, it helps us manage our packages by pulling in all the dependencies that each package needs. Specify the version of the package you’d like to use and each time you execute package updates, it will be automatically updated to the most recent version.
How to Create a Laravel Project Using Composer Command?
Setup of PHP and Composer on a Windows 10 PC is the first step. Launch PowerShell or the command prompt to install Laravel. After deciding where to save your Laravel project, install the framework by using the following command: composer create-project –prefer-dist laravel/laravel project-name.
What Is a Composer JSON File in Laravel?
Your PHP application’s root folder is where you’ll find the composer.json file, which is essentially a JSON file. Its purpose is to catalogue metadata, dependencies, and shared properties among projects. This file format is similar to.NET files.